Day 4 at the Pen Show

Last night I was looking for my Ink Journal and could not find it. I’m pretty sure the last time I saw it was in the room, but it was no where to be found this morning. Did I accidentally pack it away in my car last night?

Good thing I had another blank journal with me. A different brand, but the page size was the same. I planned on punching “disc” holes later and creating a disc-bound journal so I can swap around the pages and organize them by ink manufacturers.

After an early breakfast and seeing Hubby off (a work day for him), I went back to the ink tables to see if I was missing any ink swatches. I kept walking by this one table that had some interesting ink bottles that I never saw before. I took a seat and looked at the labels on the bottle. They looked like Akkerman ink names. Yes! I grabbed a sheet of leftover paper and wrote the name “Akkerman” for those who will be following behind me and wondering the same.

The Akkerman inks were bold and bright. I noticed my efficient ink swatching process was bogging down. It took me awhile to write out the ink names. Then I noticed most of the bottles had a number on them and so I had to go back write in the numbers in my journal. I stopped swatching long enough to take a selfie.

It was getting late and I still had to pack a few things, drop off my suit case in my car, gather my workshop supply bags, and check out of my room. Whew!

An hour later and back at the pen show venue, I had some time to walk around and take additional pictures.

I was so glad to see an array of Robert Oster Signature ink colors at the Vanness table.

Private Reserve had a table that included the new Infinity line of ink colors. I do not recall seeing any of their new shimmering inks on the table.

Here is Pen Realm:

The crowds were smaller than the day before and I had some time to try a few pens.

I saw the Platinum 3776 Century test pens and decided to do another writing sample. The testing station was missing the UEF and Music pens.

I stopped by Dromgoole’s table and saw a Leonardo Momento Zero Grande in Golden Rule with an Elastic nib. I had to try it out. What a gorgeous pen and nib combination! That pen wrote beautifully across the paper.

I headed towards the back wall and stopped by the Visconti table. I must have had the deer in head lights look and wasn’t sure what I wanted to try. I was handed a Homo Sapien Dark Age with an 18k medium nib to try. OMG! I fell in love with this pen! It was so comfortable to hold in my hand and the grip warmed up nicely in my fingers. This is what fellow Visconti pen-folks were talking about! Now, I know that feeling! That pen has made its way to the top of my list. Sigh!

Unfortunately, I forgot to take a picture of this wonderful pen. I do have a writing sample to share:

I made my way to the Esterbrook table and asked about Gena’s Journaler nib. I was given the new Estie Sea Glass pen with the Journaler nib to try out.

This Journaler nib was a wet writer with a smooth writing experience. I might be biased, but I think I prefer the Franklin-Christoph SIG nib. The Journaler nib did not create that “I must have this nib” experience for me.

I made my way back into the small ballroom and spent some time chatting with the exhibitors. Did I mention I really enjoyed my time in this room?

Mythic pens:

Hinze pens:

There was a lot to see at Hinze’s tables. So many wonderful and colorful pens!

At the Devine Island Design table, they were introducing a new pen model at this show:

This dyed Abalone ballpoint pen caught my eye. Apparently if I wanted this Abalone pen, they could convert it into a fountain pen. Something to think about.

SCHON DSGN pens:

Earlier this year, I had purchased a multi-colored Pocket Six pen from Ian. I was glad to see him here in person and showing all his lovely pen colors.

After my workshop was finished, I quickly packed my workshop gear and headed back to the pen show venue one last time.

Many of the Exhibitors had started to take down their exhibits and tables.

Many Exhibitors were still busy with potential customers and last minute sales.

I walked by Stylosuite and Les was still busy with two customers. Les had mentioned that I was his first customer at the start of the show on Friday. Since then he was always busy helping folks find the right flex nib and pen. It did not hurt that I highly recommended his pens/nibs. Les had mentioned to me that he would stay late to help a customer get the right pen.

I made my way out the double glass doors and headed to the garage. I was sad to leave the Pen Show. I had a wonderful time meeting many of the Exhibitors and pen folks sitting at the ink tables. I also made many new friends. There was a lot of learning and sharing of information about fountain pens and inks that weekend. Even Hubby commented and was amazed by the number of Exhibitors on hand and the number of people showing up for this event. He’s an amazing husband and very supportive of my creative adventures. He braved the Saturday crowds to find me a beautiful fountain pen. I could not ask for anything more.

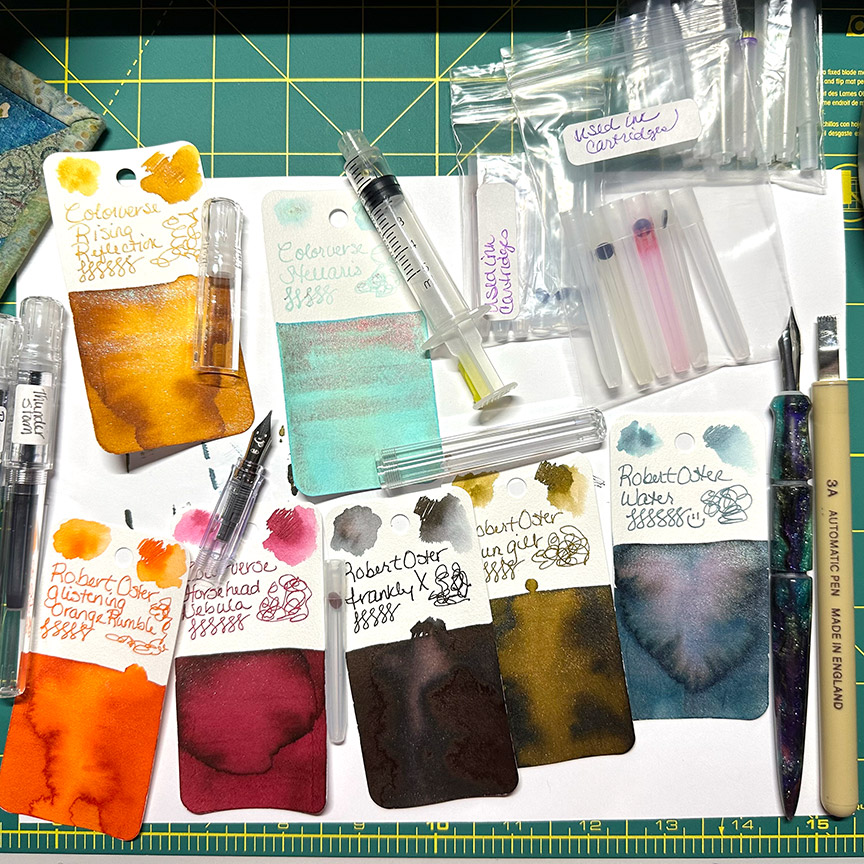
How Do I Swatch My Fountain Pen Ink Colors?

Believe it or not, I started creating my ink swatches six months after I started down my fountain pen rabbit hole. The few bottles I started with grew into a dozen bottles and well you know the rest.

I saw that my fellow fountain pen-folk were using rectangle cards on a ring for their swatches. A quick search produced: Col-o-Ring Ink Testing Book.

Here are the basic tools I use to create my swatch samples. The Col-o-Ring book contains 100 cards.

I use regular Q-tips to dip into the ink and swipe across the card. My Col-o-ring swatch cards held together with a binder ring. My glass dip pen I use to write information on my cards.

I will typically set aside a block of time to sit and swatch my colors. Usually, that means I have a handful of sample vials or a few bottles of ink that are waiting in a queue. Remember. I have a small work area and tools (ink towel, shop towels, etc) have to be collected and placed on my desk. Think of a quick setup and quick tear down. Hahaha!

On my desk, I alway have two Oui yogurt jars filled with water. Plus a jam jar for dipping dirty pens. One of the two Oui jars is filled with clean water.

I use a small crystal candle holder to hold my sample vial of ink to keep it from toppling over. I actually found a few at Hobby Lobby when they were having their 50% off candle sale.

My crystal candle holder containing a sample vial of ink. My two glass dip pens. The blue-purple pen is my latest addition. This has a slender grip that will fit all the way into the sample vial.

Basically, I start by taking my glass dip pen and dipping the nib into the ink. Just enough to cover up to the first swirl of the nib or about 1/2″ from the tip. I will write the ink brand (Diamine, Monteverde, Colorverse, etc) and the name of the ink. I’ve gotten into the habit of doing figure eights and cross hatches followed by quick scribbles with the ink. After I’ve completed the writing, I will wipe off the ink on the nib. A few dips into a jar of water will remove the remaining ink. I wipe the glass nib and get the towel into the groves/swirls to remove the water.

Next, I will take a Q-tip and dip the fuzzy part twice into the ink and then again for the third time. This will allow the ink to saturate the fuzzy part of the Q-tip. Now, I’m ready to swab my card. I swab the card using the side of my Q-tip, going left to right and move the Q-tip further down the card, left to right, until I get to the bottom edge. It’s better to do this swabbing quickly before the ink starts to dry out on the Q-tip.

Once each card is completed, I always place the cap back onto the bottle. One time I was distracted and I almost toppled a bottle of ink over. Yes. I forgot to replace the cap on the bottle when I was finished.

Here’s an example of my swatch cards. You can see my newer swatches now have the dabbled ink on the top half.

You’ll see some dots on my cards. I drop bits of water while the card is still damp and let it dry. This gives me an idea of what the base or underlying color might be. Also if it’s a sheening ink, what color will show up on the card.

In the following picture, I want to point out several things. You can see the Q-tip I used and how far I dip the tip into the ink. My blue shop towels I use to clean my pens. I find the blue shop towels to be very durable and produces no lint. From the swatch cards you can start see some lighter base colors and rings of dark color around the water drops. The colorful towel underneath used to be a white wash cloth.

My completed swatch cards waiting to dry

With certain inks, the initial or top part of the swatch will be very saturated with color and take longer to dry. Towards the bottom the color will get slightly lighter.

Here’s a few samples I did recently:

Swatches from sample vials of Colorverse inks. Note the beautiful undertones/base colors and the dark rings around the water drops.
Here’s the backside of the Colorverse swatches. I note the basic color and if the ink has any sheen or shading properties.
Here’s a sample of new Robert Oster inks.
The backside of the Robert Oster swatches. The two top cards are shimmering inks and I’ve noted what color the shimmer leans towards.

I currently have three Col-0-Rings in use. One is used for sample inks from the sample vials. Another is used for Robert Oster inks (because I have so many). The last one is used for other bottles of ink brands (Diamine, JHerbin, Blackstone, Ferris Wheel Press, Taccia, Sailor, Monteverde, etc). As you can imagine that one is getting full with the included 1-1/2″ binder ring. I may end splitting into a 4th ring. Still deciding.

Tips:

The glass dip pen I use has several swirls above the nib versus straight lines. I found having the swirls allows for more ink to settle into the grooves. I can write longer and dip my pen less often.

A brand new glass dip pen may feel scratchy at first. Take a sheet of paper and practice writing with the new glass pen. Dip the nib into some ink and just write a few quotes, to do lists, favorite musicians, etc. This will help you develop a “feel” for the glass pen and how it writes. Also, the glass tip/nib will smooth out the more you write with it.

For sample vials that have less than 2ml of ink, I have a slender glass dip pen that I can place all the way into the vial. The one that I have shown in the above pictures, the wide grip area is too wide for the vials. At most, I can dip the pen and barely reach the 2ml mark on sample vial.

I use both ends of my Q-tip for swatching. That would mean I get ink on my fingers from the previous ink color. No worries.

Can swap out the binder rings for different size rings. In my case, the binder ring started to get loose from all the color sorting I was doing. Eventually, the ring would not lock tight. I purchased extra rings at my local office supply store. The extra rings, allow me to also create several different books.